
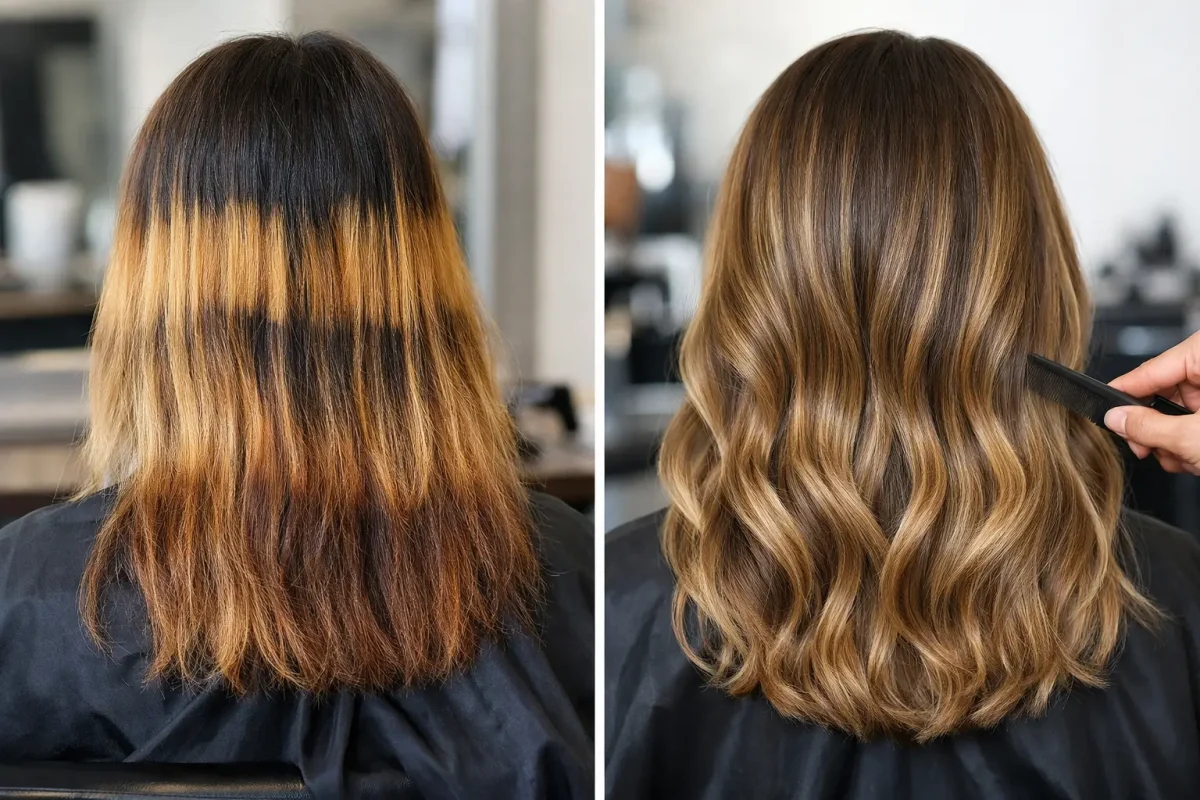
A box dye repair example can look very different from the dramatic before-and-after videos online. Sometimes the fix is possible in one carefully planned appointment. More often, the best result comes from a staged approach that protects the hair while gradually removing uneven color, unwanted warmth, and harsh lines.
Picture this: a client has naturally medium brown hair and has used a dark brown box dye several times over the past year. The first application looked rich and glossy. Each top-up, though, was pulled through the ends “just to freshen it up.” Now the roots are a warm medium brown, the mid-lengths are much darker, and the ends look almost black in some lighting. She wants a softer, lived-in brunette with caramel dimension.
That is not a simple color appointment. It is color correction, and the plan needs to respect both the desired look and the hair’s history.
Why box dye creates uneven color
Box dye is designed to give a broad range of hair types a noticeable result at home. The issue is not that every box dye is automatically disastrous. The problem is that it cannot account for your individual hair density, porosity, previous color, gray coverage needs, or the way your hair absorbs pigment from roots to ends.
Permanent dark formulas are especially tricky because they often contain a high concentration of artificial pigment. When the same shade is reapplied over previously colored lengths, the color does not simply stay the same. It builds up. Porous ends can grab the formula quickly, leaving hair darker and flatter than the fresher growth at the scalp.
A box color can also reveal a surprise undertone. Hair lightens through warm stages – red, orange, then gold – before reaching pale yellow. If dark artificial color is lifted, those underlying warm tones may appear. That does not mean the correction has gone wrong. It means the stylist needs to work with the hair’s actual starting point rather than promise an unrealistic one-day transformation.
Box dye repair example: the first appointment
For our brunette example, the goal of appointment one is not to create perfect caramel ribbons immediately. It is to create an even, workable foundation and assess how the hair responds. A professional consultation starts with questions: What colors have been used? How often? Was the color applied all over or only to the roots? Has the hair been bleached, straightened, or exposed to frequent heat styling?
The stylist then examines the hair in natural-looking light. The ends may be dry and overly porous, while the root area is relatively healthy. Those sections cannot be treated identically. A strand test is often the smartest first step because it shows how much artificial pigment can be removed without pushing the hair beyond its comfort zone.
In this scenario, a gentle color-removal or color-reducing service may be used first to loosen some of the dark artificial dye. This is different from applying strong lightener from root to tip. The aim is to remove unnecessary buildup while preserving as much condition as possible.
After removal, the hair may reveal warm brown and copper tones through the mid-lengths, with the darkest areas still sitting on the ends. That is normal. The stylist may add a few carefully placed foils or painted pieces where the hair can safely lift, then use a toner or gloss to blend the warmth into a more intentional brunette result.
The client leaves with a softer overall color, less obvious banding, and the beginning of dimension. It may not yet be the bright caramel balayage saved on her inspiration board, but it looks polished, believable, and far healthier than forcing the process further.
Why the repair is often done in stages
Hair does not have an undo button. The more layers of dark dye involved, the more patient the correction needs to be. Trying to lift everything at once can lead to excessive dryness, breakage, or color that turns patchy again within weeks.
A second appointment, usually scheduled after the hair has had time to recover, can build more brightness through the mid-lengths and ends. By then, the stylist can see what warmth remains, how the previously colored areas are holding up, and whether the target shade needs to be adjusted. A caramel brunette may become possible at this stage, or the better choice may be a richer beige brown with subtle golden pieces.
At a third appointment, fine highlights or a more pronounced balayage can add the movement the client originally wanted. This sequence can feel slower than a single dramatic session, but it gives the hair a far better chance of staying shiny, touchable, and strong.
The trade-off is simple: faster lifting can create a bigger immediate change, but gradual work generally gives more control over condition and tone. The right route depends on the color history, the hair’s elasticity, and how light the final result needs to be.
What a realistic result looks like
A successful box dye correction is not defined only by how light the hair becomes. It is defined by whether the color looks even, suits the client, and leaves the hair in a condition that can be maintained.
For the dark brunette example, a realistic first-session result may be a dimensional chocolate brown with subtle warm ribbons rather than a high-contrast blonde balayage. The visual difference can still be striking. Removing the inky, one-dimensional buildup lets the cut and texture show again, while a tailored gloss adds reflected light and makes the color look deliberately expensive rather than accidentally uneven.
Your inspiration photos matter, but they need context. A photo of sunlit beige blonde may show hair that began much lighter, had no permanent color history, or was achieved across multiple visits. A good stylist will use the photo to understand the mood, placement, and level of contrast you love, then map a version that works with your hair.
How to prepare for a color correction appointment
Honesty helps more than a perfect-looking reference photo. Before your appointment, write down every color product used in the last few years if you can remember it, including supermarket dyes, color-depositing conditioners, henna, glosses, and “temporary” shades. Bring photos of your hair before the box dye if you have them.
Avoid another at-home color attempt while you are deciding what to do. Covering uneven dark hair with another dark shade may make it look better briefly, but it often adds another layer that has to be worked through later. Likewise, trying to bleach dark box color at home can create hot roots, orange bands, and fragile ends very quickly.
Use gentle care between appointments. Limit hot tools where possible, use a heat protectant when styling, and follow the product guidance provided for your hair. If your stylist recommends a bond-building or moisture-focused routine, consistency matters more than using a cupboard full of random treatments.
When darker is the better repair choice
Not every correction needs to move lighter. If the hair is fragile, highly porous, or uneven after a failed lightening attempt, the most flattering and responsible option may be to refine it at a deeper level first. A rich brunette gloss, soft root melt, and strategic lowlights can make the hair look more even and healthier while giving it time to recover.
That is not settling. Deep, glossy shades can be incredibly modern, especially when the tone is customized to your skin tone and the color has subtle movement rather than a flat, solid finish. Once the hair is stronger, lighter pieces can be introduced gradually if that is still the goal.
The best color correction plan is one that gives you a result you can enjoy now while keeping future options open. Book an appointment at Twisted Scissors in Bridgeman Downs to create a personalized repair plan for your hair.